 Catch my guest post on Lazaro Cooks. Merry Christmas!
Saturday, December 24, 2011
Ponche de Creme - a recipe for Trinidad egg nog.
Catch my guest post on Lazaro Cooks. Merry Christmas!
Monday, November 7, 2011
Kohlrabi and Apple Salad with Creamy Mustard Dressing

Kohlrabi is a new ingredient for me, as it is for many people I have spoken to recently. It turns out, this vegetable has a crisp, crunchy texture which is perfect for salads. As a matter of fact, the salad that follows is a crunchy salad in general, with crisp apples, and candied pecans that requires a smooth, contrasting dressing.
Kohlrabi and Apple Salad with Creamy Mustard Dressing
2 green kohlrabi, peeled and sliced or diced
2 Fuji or SweeTango Apples, sliced or diced
1/4 cup candied pecans
Combine the kohlrabi, apples, and the dressing. Toss well to combine. Top with candied pecans to serve.
Monday, October 31, 2011
Pumpkin Risotto with Caramelized Pumpkin
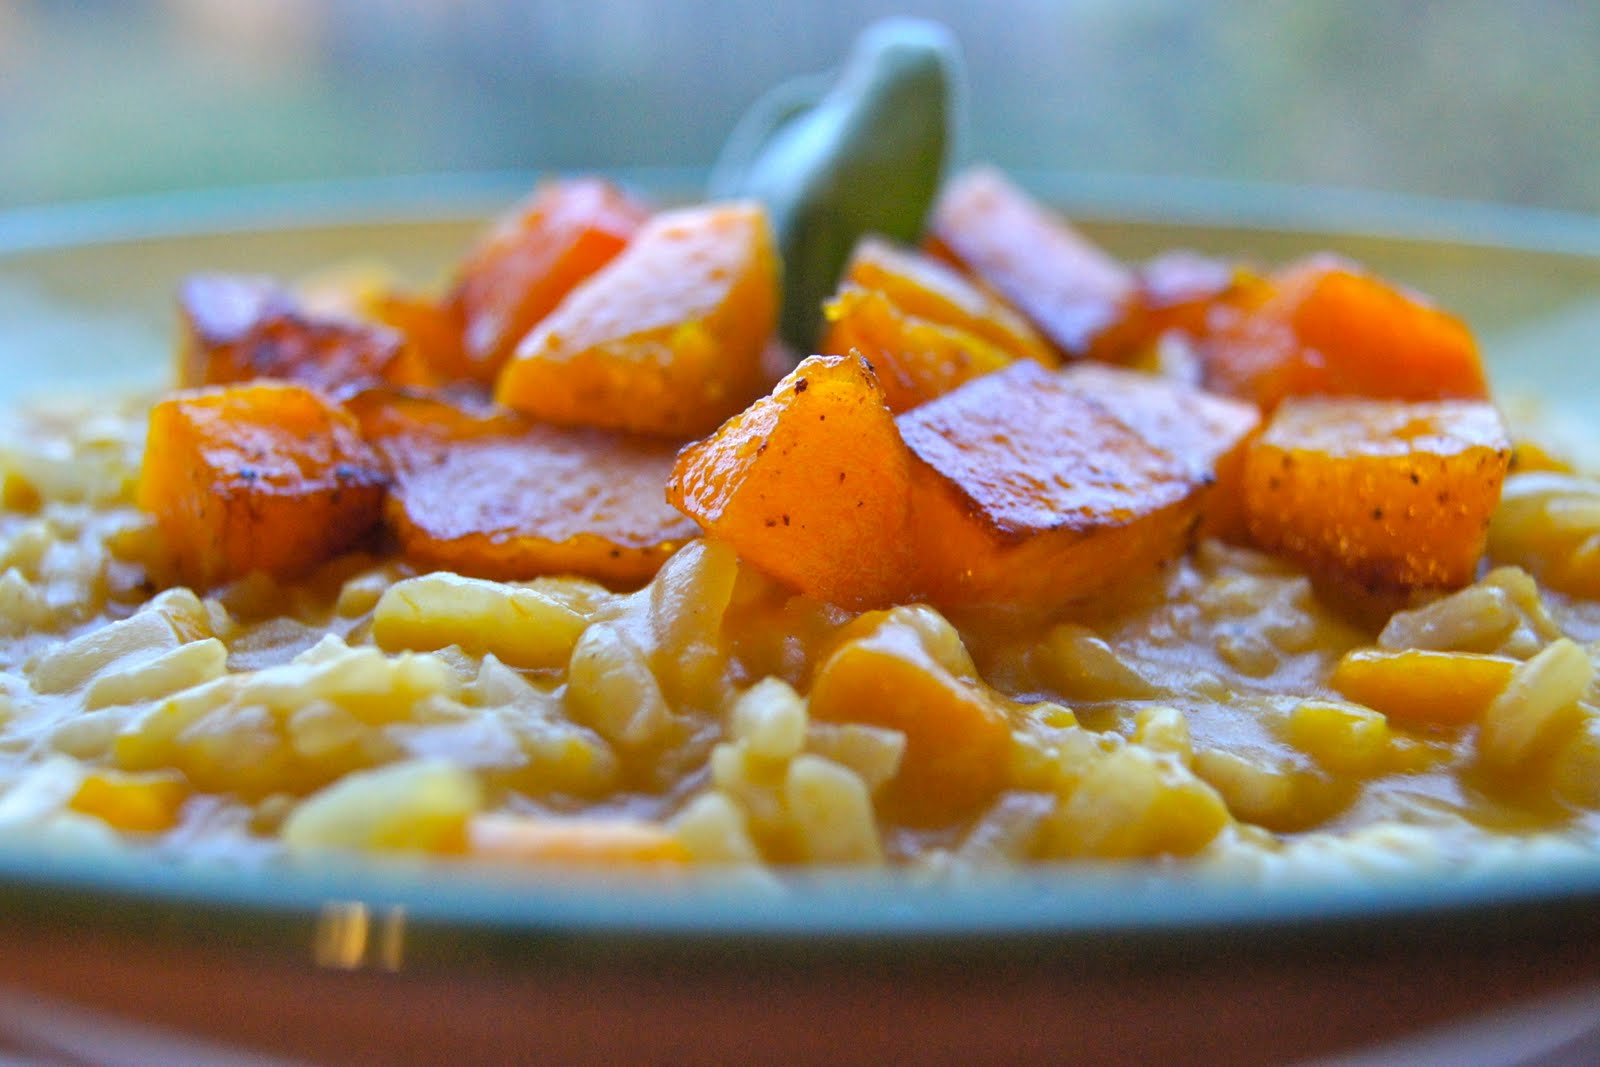
Fall is a great time to cook. Apples and pumpkins are abundant at this time, and they happen to be two of the ingredients I really enjoy cooking with. This fall marks the first time I have made this dish but it is certainly not the last. Risotto, on its own, is a creamy dish but add pureed pumpkin and that creaminess is intensified. You can see the pumpkin melt like butter as you stir it in at the end.
Serves 4 to 5
5 to 6 cups low sodium chicken broth
2 tbsp butter
1/2 cup diced onion
2 garlic cloves, minced
2 whole sage leaves
1 1/2 cup arborio rice
1/2 cup white wine
1/2 cup pumpkin puree
1/3 cup grated parmesan
1. Bring the broth to a simmer and keep warm over a low heat.
2. Add the butter to large stock pot over medium heat. Cook the onions, garlic, and sage until softened, about 4 to 5 minutes.
3. Add the rice, and toast for 2 minutes. Pour in the white wine and stir slowly until most of it has abosrbed. Once the wine has absorbed, add the chicken broth 1/2 cup at a time stirring almost continuously and waiting until almost all of the broth has absorbed before adding each cup.
4. When the rice is cooked -tender but firm to the bite- discard the sage leaves and stir in the pureed pumpkin and cheese. Serve topped with the caramelized pumpkin.
Sunday, October 23, 2011
Poached Pears in Port Reduction

I derive much happiness from cooking. Even when my weeks are hectic, making a meal at home is a constant that I look forward to. Cooking provides a pleasant distraction amid all the dreaded papers and exams that seem to occupy my time recently (having recently started working on my Masters) and the many deadlines I barely meet.
This past weekend, I had the house to myself so naturally I cooked: Poached Pears in Port Reduction to which I added cinnamon and star anise. Believe me, it smelled like Christmas in the kitchen! And was a great - albeit short - break from my paper which is due in less than twenty four hours.
Poached Pears in Port Reduction
Serves 4
4 bosc pears
3 cups port
1 cup apple cider
1/4 cup sugar
2 cinnamon stick
4 whole star anise
1. With a damp towel wipe the pears clean and peel, leaving the stems intact.
2. Bring the rest of the ingredients to a simmer in a large sauce pan add the pears, and cook for about five minutes on each side until they are easily pierced with a knife. Remove the pears and place upright in a serving dish.
3. Continue to cook the liquid until thickened about 10 to 15 minutes more. Pour over the pears and serve. Moreover, add a scoop of vanilla ice cream on the side of each pear and drizzle with the warm port reduction.
Saturday, October 15, 2011
Caramelized Pumpkin with Maple Sugar and Ginger

Here is an easy recipe for caramelized pumpkin which is absolutely delicious on a salad or as a side dish. The maple sugar used here is from the Sand Man at the Minneapolis Farmers' market. However, if you cannot find maple sugar, brown sugar is a good substitute.
Caramelized Pumpkin with Maple Sugar and Ginger
2 tbsp butter
2 tbsp maple sugar*
1 tsp grated, fresh ginger
1/2 tsp cinnamon
In a large skillet over medium heat, melt the butter and add the diced pumpkin. (Try to arrange the pumpkin in a single layer so that the cubes cook evenly. ) Cook for about 10 minutes, stirring occasionally, being careful not to crush the pumpkin cubes.
Remove from the heat and stir in the maple sugar, ginger and cinnamon.
*Brown sugar can be substituted for maple sugar.
Friday, October 7, 2011
Toasted-Almond Rice

Toasted-Almond Rice
Serves 4
1 ½ cups basmati rice
3 cups water
¼ cup almonds
¼ cup chopped scallions
2 tbsp chopped parsley
3 tbsp salted butter
1. Bring the water to a boil and add the rice, and a pinch of salt. Stir, lower the heat to medium, and allow to simmer for 20 to 25 minutes until cooked.
2. While the rice is cooking, coarsely chop the almonds. Toast in a pan over medium high heat for 6 to 8 minutes. Shake the pan a few times so that the almonds toast evenly and they don’t burn.
3. Once the rice has cooked, add the toasted almonds and the remaining ingredients. Fluff with a fork to combine.
Thursday, September 1, 2011
Sauteed Apples with Star Anise and Cinnamon

My second recipe for the market talk this Saturday is a variation of my previous recipe for Amaretto Apples. Instead of using amaretto, this recipe calls for star anise and cinnamon sticks.
Sauteed Apples with Star Anise and Cinnamon
Serves 4
4 -5 apples
3 tbsp butter
2 cinnamon sticks
4 star anise
1/4 cup sugar
1. Prepare the apples: Wash and thoroughly dry the apples, then core and slice them. Set aside.
2. Set a skillet over medium heat and melt the butter. Add the cinnamon sticks and whole star anise and cook for a further two minutes. Add the apples and cook until fork tender, about 6 to 8 minutes. Stir in the sugar and cook until a thin sauce forms.
3. Serve over low fat ice cream or angel food cake.
Monday, August 29, 2011
Sweet Corn Quesadillas

Roasted corn. Boiled corn. Corn soup. Corn salsa. It's sweet corn season and what better time to be doing a cooking demonstration than now. This coming Saturday, I will be at the Minneapolis Farmers' market demonstrating how to assemble sweet corn quesadillas. So over the weekend, I've had the great pleasure of testing and re-testing ( a really tough job) this recipe. Essentially, the filling is a salsa: lots of corn, fresh cilantro, onions, and jalapenos, if you like. How you prepare the corn is also up to individual taste. However, I will recommend using roasted corn which has more flavor than boiled or steamed.
Don't forgot to stop by the Farmers' Market this weekend for tasty samples!
Sweet Corn Quesadillas
Serves 4
2 roasted corn on the cob
zest of 1 lime
1 garlic clove, grated
1/4 cup finely diced red onion
1/2 cup chopped cilantro
1/4 tp ground cumin
8 flour tortillas
1 cup grated cheese
1. Remove the kernels from the corn cobs, and combine with the rest of the ingredients, except the tortillas and cheese together. Mix well.
2. Place one tortilla in the bottom of a warm skillet set over medium to low heat. Place two tablespoons of the salsa mixture evenly on one half of the tortilla. Sprinkle about a tablespoon of cheese over the salsa mixture, and fold the other half of the tortilla over the top. Press down lightly and flip the quesadilla. Cook until the quesadilla has lightly brown on both sides, and the cheese has melted.
3. Repeat with the remaining ingredients. Serve with a side salad for lunch or in small triangles as an appetizer.
Thursday, August 18, 2011
Brown Rice Risotto with Cremini Mushrooms

Almost an hour. That is how long it will take to prepare this brown rice risotto but your efforts will be worth it. Hearty cremini mushrooms are sauteed in shallots and garlic before toasting the rice for additional flavor. It takes just a minute but toasting the rice before adding the stock is a necessary step that adds flavor and promotes the release of starches that contributes to the dish's creamy texture. (In this video, Lydia Bastianich elaborates on the basic techniques of preparing risotto.)
While white arborio rice is used for traditional recipes, brown arborio rice is also available. Brown, short grain sushi rice can also be used. Sushi rice in general is highly starchy and the brown version is nuttier and tastier in my opinion. For health reasons or not, brown rice is always my choice.
Brown Rice Risotto with Cremini Mushrooms
Serves 3 to 4
3 cups low sodium chicken stock
4 cups water
3 tbsp vegetable oil
2 shallots, diced
1 garlic clove minced
1 1/2 cup sliced cremini mushrooms
1 cup brown short grain rice
1/3 cup grated parmesan
1. Combine the chicken stock and water in a saucepan and keep warm over low heat.
2. Heat the oil in a large pot over medium heat. Add the shallots and cook for 2 minutes. Add the mushrooms and garlic and cook for another 3 minutes.
3. Stir in the rice and cook for a minute before adding 1 cup of the chicken stock mixture. Cook until most of the liquid has been absorbed. Add the remaining stock, 1/2 cup at a time, just as the rice begins to cling to the pot. Stir frequently until the rice is cooked, about 40 to 45 minutes.
4. Stir in the parmesan and serve.
Wednesday, August 10, 2011
White Chocolate Mint Mousse

Warning: This is highly addictive! The recipe is pretty simple - only three ingredients - and the hardest part is waiting for the mousse to set. I would recommend serving it in mini dark chocolate cups similar to those in the photo above, which are available at Lunds. They fill about two ounces of mousse each which makes a perfect serving size.

White Chocolate Mint Mousse
(Adapted from Epicurious)
8 oz white chocolate
1 1/2 cup heavy whipping cream
1/2 tsp peppermint extract
6 mini dark chocolate cups (optional)
1. Melt the white chocolate and 1/2 cup heavy cream in a double boiler set over low heat. Remove from the heat and allow to cool for 30 minutes. The mixture will begin to thicken during this time.
2. Whip the remaining 1 cup of cream and the peppermint extract to stiff peaks. Fold half of the whipped cream into the chocolate mixture so that no visible signs of the white chocolate remains.Then, carefully, fold in the remaining whipped cream. Divide among dark chocolate cups or servings glasses and chill for two hours before serving.
Thursday, August 4, 2011
Crispy Squid with Fresh Culantro (Shado Beni) Dressing

I started this post in New York City where I spent the past week. Two things really define my visits to the city: catching up with friends and relatives, and the food . (Although, the record breaking heat at the end of this trip made it all the more memorable). More specifically, the fresh food. Quite undoubtedly, New York gets an impressive variety of fresh food - from seasonal fruit to exotic herbs to seafood.
On the corner of Sutphin Boulevard and 91st Avenue in Queens is King Fish. From outside, it is hard to imagine that this establishment, with its small store front and simple sign, is one of the most popular in the borough. Traffic through here is always constant which can easily be due to New York's dense population but which just as easily can be attributed to the impressive selection of seafood here. Red snapper, grouper heads, scungilli, king fish. An excellent variety to say the least; a selection that caters to the city's diverse communities - those grouper heads are a favorite among Trinidadians for fish soup.
If all I could do was peruse the market, I would be content with that. But as luck would have it, I did get to do a bit of cooking during this trip. I knew I wanted to make a seafood dish but the question was which seafood. It's funny how an abundance of fish, clams, and fresh water crab can confuse a usually decisive person. In the end, I settled with squid. My plan was to fry it and serve with a dressing made up of fresh garlic, jalapenos and culantro. Not cilantro. Culantro.
Ask any Trinidadian cook what herb they must have and culantro (also called shadon beni - pronounced shadow benny- and bandanya) tops the list. We use it to season meats and fish (bound for stews, the grill, the frying pan or the oven), salads, soups, curries. You get the picture - anything savory. Its peppery, lemony scent is quite distinct and offers a level of freshness lacking in other herbs. Ok, I am biased. What can I say? It's been used in cooking throughout my life so forgive my sales pitch. Finding culantro in the markets of Queens was not a difficult task- look right next to the thyme and cilantro- but Minnesota is a different story altogether. I was lucky a couple of years ago to find it at the farmers' market. If not, try your closest Vietnamese store. (Last I checked, Sun Foods in Brooklyn PArk stocked it.) If you have exhausted all means and still cannot find it, then a suitable substitute in this recipe is the common cilantro. Whichever herb you use, I hope you have fun with this recipe and enjoy eating it as much as I did.
Crispy Squid with Fresh Culantro (Shado-beni) Dressing
Serves 4
1 1/2 cups all purpose flour
1/2 cup corn meal
salt and pepper
vegetable oil for frying
juice of 1 lemon
8 culantro leaves
1 garlic clove
1 jalapeno
1/3 cup olive oil
1. Combine the all purpose flour, cornmeal, salt and pepper. Toss the squid in the flour mixture and fry in small batches until lightly golden brown. Transfer to paper towels to drain.
2. Add the lemon juice, culantro leaves, garlic, and jalapeno to a blender and pulse until coarsely chopped. With the motor running, slowly pour in the olive oil. Drizzle this dressing over the squid and serve immediately.
Monday, July 11, 2011
Mojito

Muddle: to mix, to make muddy or to make a mess of.
Probably the most savory use of this word is in recipes for mojitos. The following is a basic recipe for the cuban standard.
Serves 1
4 mints leaves
juice of 1/2 lime
1 tbsp sugar
2 oz light rum
2 oz club soda
1 spring mint
Muddle or crush the mint leave into the lime juice, at the bottom of a tall glass. Add sugar and continue to muddle to release most of the mint oils. Fill the glass with ice and pour in the rum and club soda. Stir and serve.
juice of 1/2 lime
1 tbsp sugar
2 oz light rum
2 oz club soda
1 spring mint
Muddle or crush the mint leave into the lime juice, at the bottom of a tall glass. Add sugar and continue to muddle to release most of the mint oils. Fill the glass with ice and pour in the rum and club soda. Stir and serve.
Monday, July 4, 2011
Low Fat Lime Cheesecake with Fresh Strawberries

The farmers market is the place to find the freshest strawberries at the moment. So, if you haven't done so already, stop by and pick yourself up a couple pints before the season is over. Then try this low fat cheesecake recipe.
Happy 4th!
Low Fat Lime Cheesecake with Fresh Strawberries
Makes one 8" cake
1 cup graham cracker crumbs
1/4 cup sugar
1/4 cup melted butter
2 eight oz packets fat free or low fat cream cheese (at room temperature)
1/4 cup low fat milk
2 eggs (at room temperature)
3/4 cup confectioners' sugar
zest and juice of 1 lime
1 tsp vanilla extract
1 1/2 pints fresh strawberries, washed and hulled
2 tbsp sugar
1. Set the oven to 350 degrees F. Spray an eight inch spring form pan with cooking spray and set aside.
2. Combine the graham cracker crumbs, sugar, and melted butter and press unto the bottom of the spring form pan. Bake for ten minutes and remove from the oven to cool while you prepare the filling.
3. In a mixer, combine the cream cheese, milk, confectioner's sugar, lime zest, lime juice, and vanilla extract. Pour unto the crust. Cover the bottom of the pan with aluminum foil and set in a water bath. Bake for forty to forty five minutes until the edges are firm and the center is still a little soft. Turn off the oven and allow to finish cook in the warm oven. Cool completely in the oven before refrigerating for at least five hours or overnight before topping with the berries.
4. Combine the fresh strawberries with two tablespoons of sugar and set aside for five minutes until the juices begin to form. Arrange on the top of the cheesecake and serve.
Wednesday, June 29, 2011
Jalapeno Burgers

Even though she lives in Canada, my sister and I talk every day, thanks to Skype. And much of what we talk about is food. Younger though she may be, she never hesitates to give me her take on anything I do, including my cooking. Today, when I mentioned that I made burgers, she promptly exclaimed, "All I want to taste in a burger is the meat!" This is one of the preferences we have in common: our appreciation for the simplicity that is a good burger. I believe that a beef burger should consist of meat and one or two other flavor enhancers (besides salt and pepper of course.) Other flavors should come from the toppings. The following recipe is made with ninety percent lean beef, a couple jalapenos, and finely grated garlic. For the toppings, I recommend cheddar and grilled onions rings. My sister should approve.
Makes 8
2 lb lean ground beef
2-3 jalapenos minced
2 tbsp finely chopped cilantro
3 garlic cloves, grated
1/2 tsp salt
1/2 tsp pepper
1. Combine all of the ingredients thoroughly. Divide the mixture into 8 portions and form into 1 inch thick patties.
2.Preheat the grill to medium-high heat. Grill the patties for 3 to 4 minutes on each side until the juices run clear and cooked to desired doneness. Serve on hamburger buns, top with slices of cheddar cheese and grilled onions rings.
Tuesday, June 21, 2011
Citrus Sangria

Truth be told, I have been making sangria long before the weather became hot enough for this refreshing beverage. Twice already for the week, actually. Ever since meeting a group of friends one late summer evening two years ago at El Meson for a paella dinner, I have been hooked. Our meal was ordered with a pitcher of delicious red wine sangria. It was easily eighty degrees that night but the delightful mix of good company, incredible paella and strong sangria made it one of my most memorable meals, and elevated El Meson to one of my favorite restaurants in the uptown area. The following recipe is one for a white wine sangria with slices of oranges and lemons that is perfect for any evening.
Citrus Sangria
Serves 6 to 8
2 bottles pinot grigio
1/2 cup orange liqueur
juice of 1 orange
juice of 1 lemon
1/4 cup sugar
1/2 cup club soda
1 orange, thinly sliced
1 lemon, thinly sliced
Combine the first five ingredients, mixing well to dissolve the sugar. Refrigerate for at least an hour. Right before serving, add the club soda and fresh citrus slices. Stir and serve over ice.
Tuesday, June 14, 2011
Grilled Tamarind Chicken with Pineapple Salsa

These past evenings have been almost perfect! Warm enough temperatures and sunny clear skies. I have been passing the time just sitting on the deck feeling the perfect wind on my face with a glass of wine in my hand. It must be the knowledge that this weather is not here to stay that makes this simple routine all the more enjoyable. If it weren't for the grill, which is just three feet away from where I usually sit, it is quite possible that I would be inclined to do little cooking.
Here is an easy recipe for grilled chicken with a tamarind marinade. Though found only in a few grocery stores in Minnesota (try Cub Foods), tamarind is such a delightful thing that it is worth an extra trip to the store.
Grilled Tamarind Chicken with Pineapple Salsa
Serves 6
1 1/2 cup tamarind chutney
2 large garlic cloves, grated
1/4 cup chopped cilantro
Pineapple Salsa (see recipe below)
1. In a shallow bowl, combine the tamarind chutney, grated garlic, and cilantro. Reserve half cup for basting.
2. Season the chicken with salt and pepper and add the tamarind marinade. Set in the refrigerator until ready to grill.
3. Set the grill for medium heat and lightly oil the grill grate. Grill the chicken for 6 to 8 minutes on both sides or until done. Baste occasionally during cooking with the reserved tamarind marinade. Serve with fresh pineapple salsa.
Pineapple Salsa
12 cups diced fresh pineapple
1/2 cup diced red onion
1/4 cup chopped cilantro
2 small jalepenos, seeded and finely diced
To prepare the salsa, combine the pineapple with the rest of the ingredients. Serve over the chicken.
Wednesday, June 1, 2011
Herb Gardening Tips from Bonnie Dehn

Minnesota's Herb Lady Bonnie Dehn
It took me some time but my herb garden has finally been planted. I had been hesitant to get it started this spring simply due to our erratic weather and, shamefully, gardening has never been my forte. No, those genes went to my sister. So I needed help. Luckily, Minnesota’s own Herb Lady Bonnie Dehn of Dehn’s Gardens lent her expertise. The following are a few tips offered by Bonnie for a successful garden this season.
First things first.
According to Bonnie, the first thing you need to do is to grow herbs you think you will use. Next, determine a location for your garden. Close proximity to your kitchen is a good idea. If open yard space is not convenient then consider container gardening (which was my approach.) The advantage of growing herbs in containers or pots is that they can be placed anywhere. This is a good thing for herbs that do not require much sun (such as chervil, sweet marjoram, and lemon and lime basil.) Container gardening requires a little more attention than plants grown in conventional garden space, however. For one, all containers should have an unplugged drainage hole at the bottom. Secondly, since plants grown in pots dry out faster than in open soil, watering frequently is is a must.
Easiest to grow.
All herbs may be difficult to some and very easy to others. Start with the herbs you love to cook with. Basil, large leaf parsley, Italian parsley along with rosemary, mint -mint grows everywhere - and chives. This group of herbs are relatively easy to grow; lots of sun, water as needed and be sure to use them.
Some require more attention.
Cilantro, dill and marjoram are more difficult to grow. Dill and cilantro are short term growing herbs - about six weeks for best flavor. As dill and cilantro mature they become more pungent;cilantro especially will take on a strong flavor. Many do not care for this "stronger" flavor and therefore these should be planted every month, in order to keep the consistency of their flavors.
Growing herbs together.
Most herbs can be grown together in one pot. However, combining the herbs does bring in insects on occasion, in particular aphids.
Will bugs bug my garden?
“You better believe it!” says Bonnie. However, some herbs actually repel bothersome insects, even our stubborn Minnesota mosquitos! Try planting something lemon-scented such as lemon thyme, lemon basil or lemon scented geraniums, which are natural bug repellants. Remember that it is good to have some bugs around; lady bugs and praying mantis tend to eat the troublesome ones.
Have fun with your garden this spring. But if you do not have the time for gardening or the desire to get dirt under your nails but still want fresh herbs, stop by the Farmers’ Market on Lyndale Avenue in Minneapolis and pick up one of Dehn's Garden's prepared mixed-herb pots. There is a variety of combinations to chose from. Which ever way you chose to obtain your herbs this season, be sure to enjoy them! Here are some of Bonnie's recipe for inspiration.
Saturday, May 21, 2011
Asparagus Tart

Admittedly, puff pastry is one of my favorite ingredients. Besides the obvious - it's innate buttery goodness - it is quick to bake with and can transform something as simple as asparagus into something extravagant. Not there is anything simple about these local asparagus. At present, the farmers market is teeming with these young and tender spears. It will be worth your trip there.
Asparagus Tart
Serves 4
1/2 pound fresh asparagus
1 sheet frozen puff pastry1/2 cup ricotta cheese
1/2 cup grated cheddar
freshly ground black pepper
salt
1. Set the oven to 400 oF. Roll out the puff pastry onto a baking sheet. Using a sharp knife, lightly score the pastry one inch from the edges to make a inner rectangle. With a fork, pierce this rectangle at 1 inch intervals and bake for 15 minutes.
2. Remove the pastry from the oven and spread the ricotta evenly across the inside of the pastry shell, followed by the cheddar and the asparagus. Sprinkle lightly with salt and freshly ground black pepper. Bake for 10 to 15 minutes until the cheese is melted and lightly golden brown.
Saturday, May 14, 2011
Spring Lettuce Salad with Warm Bacon Vinaigrette

The Minneapolis Farmers' Market is open for the season! And even though our last winter was absurdly long and spring is being a bit temperamental, the farmers ever so dutifully strive provide a lot to amuse our taste buds and cooking pleasures. Cheeses, honey, turnips, asparagus, meats, and endless flowers and herbs for planting. The basis for this vinaigrette is some bacon I purchased from meat sellers Bar Five. It's hard to resist a salad with all the intensity of bacon! You can use spring lettuce or baby spinach for this salad. I happen to enjoy the abundance of spring lettuces around these days so it's used here but be sure that, once you toss with the warm vinaigrette, you serve immediately as the tender leaves will wilt more quickly than spinach leaves.
Spring Lettuce Salad with Warm Bacon Vinaigrette
Makes 4 servings
4 oz bacon, diced
2 tbsp brown sugar
2 oz red wine vinegar
2 oz vegetable oil
6 to 8 oz fresh spring lettuce leaves
1/3 cup dried cranberries
1 yellow bell pepper, diced
1/2 cup croutons
1. Render the bacon over medium heat until crisp. Remove and reserve the bacon bits and add the sugar to the bacon fat; blend to dissolve.
2. Remove from the heat and whisk in the vinegar and oil to form an emulsion; season with salt.
3. Toss the lettuce, cranberries, diced pepper, croutons, reserved bacon, and vinaigrette. Serve immediately.
Saturday, April 23, 2011
Cranberry Almond Hot Cross Buns

Here is a variation on an Easter classic.
Happy Easter!
Cranberry Almond Hot Cross Buns
Makes 12
3 cups all purpose flour
1/2 tsp salt
1/2 cup warm milk
1 packet instant yeast
1/3 cup sugar
2 eggs
3/4 cup cour cream
1 tsp almond extract
1/2 cup dried cranberries
1/2 cup coarsely chopped roasted almonds
1 egg white
Glaze:
1/3 cup confectioners sugar
2 tsp milk
1 tsp orange extract
1. Combine the flour and salt. Set aside.
2. Add the warm milk, yeast and 1 tbsp of the sugar to the bowl of a standing mixer, stir lightly with a spoon and let sit about 10 to 15 minutes until foamy. Add the eggs, sour cream and the remaining sugar. Using the paddle attachment mix until just combined. Replace the paddle with the dough hook attachment.
3. Add the flour and knead on until combined. Do not be to alarmed if you find that the dough is sticky; this is a wet and sticky dough. Remove the mixing bowl with dough to a dry place in the kitchen, cover and allow to rise until doubled in sized, between 1 to 2 hours.
4. Set the oven to 400 degrees F. Now return the bowl to the mixer and add the cranberries and almonds until evenly dispersed throughout the dough.
5. Transfer the dough to a floured work surface and lightly pat into an evenly round mass, using extra flour for your work surface to prevent sticking. Cut into 12 pieces. Shape each piece into a ball and transfer to a well greased baking dish so that they barely touch one another. Cover, set aside and allow to rise for another 1 hour.
6. Brush tops with egg whites and bake at 400 degrees F for 10 minutes. Reduce oven to 300 degrees F and bake for a further 10 to 12 minutes. Remove the baking dish from the oven and transfer unto a cooling rack. Cool buns for 2 to 3 minutes in dish, then remove and cool directly on the wire rack. While they are still warm to the touch, drizzled the glaze in a cross pattern on each bun.
To make glaze: Mix all ingredients until well combined.
Friday, April 22, 2011
Raspberry Sauce

Sunday, April 17, 2011
Chicken and Artichoke Flatbread With Balsamic Reduction

Tonight, as I made the balsamic reduction for this flat bread, I am reminded of an odd but endearing characteristic of the Trinidadian culinary culture: all pizzerias serve ketchup (and often mustard) with pizza. Weird but true. Ketchup is not actually put on the pizza before being brought to the table but is an option which most people chose to have. In fact, so entrenched is it in our eating habits that, when the first Pizza Hut franchise was established on the island, they too recognized the association we've made with between pizza and ketchup and generously provided the condiment. I don't know how the practice started but it has been around for many years. Obviously, the concept of topping a pizza, or in this case a flat bread, with condiments has not been lost on me. While this flat bread can be made without the balsamic reduction, the sauce is a delightful addition.
Chicken and Artichoke Flatbread With Balsamic Reduction
1 roasted chicken breast, coarsely diced
1 1/2 cups artichoke hearts, sliced
1 cup grated, mild cheddar
2 tablespoons minced tarragon
Flatbread dough (see recipe here)
Balsamic Reduction (see recipe below)
1. Flatten the dough unto a pizza tray or greased sheet pan and spread half of the cheese evenly over the top. Follow with the chicken, artichokes and the rest of the cheese. Bake at 375 degrees F for 15 to 20 minutes.
2. Remove from the oven and top with the tarragon and drizzle on the balsamic reduction before serving.
Balsamic Reduction
1/2 cup balsamic vinegar
1 tbsp sugar
Whisk vinegar and sugar in a saucepan over medium heat, stirring constantly until reduced to a syrup-like consistency, about 6 to 8 minutes.
Sunday, March 6, 2011
Rum and Raisin Bread Pudding with Rum Sauce

Have you ever made a dish that you just cannot wait until it’s finished cooking? You ate it hot - right out of the oven, ate it again once it’s cooled and go to bed anticipating the following day so that you can have more of it? Ok, I guess if I really think about it, many foods can fall into this category. At the moment, however, this Rum and Raisin Bread Pudding tops the list. The rum for this recipe is a Trinidadian rum (Angostura Premium 1919) given to me by my father during his visit last December. Since then, I’ve been waiting for an opportunity to cook with it. Good thing rum does not spoil but only gets better with time. And it adds a distinctly exotic yet mellow flavor to bread pudding.
Rum and Raisin Bread Pudding with Rum Sauce
Serves 6
1/4 cup raisins
1/4 cup dark rum
8 oz bread, cubed
1 cup milk
4 eggs
1/2 cup sugar
1/4 tsp nutmeg
Rum Sauce (see recipe below)
1. Pour the rum over the raisins and allow to soak for 10 minutes. Strain and reserve the liquid.
2. Whisk together the milk, eggs, sugar, reserved rum, and nutmeg. Pour over the cubed bread and toss well. Transfer to a greased 8” baking dish and sprinkle the rum-soaked raisins on top. Cover with plastic wrap and refrigerate for 30 minutes.
3. Bake at 350 oF for 40 to 45 minutes. Serve warm drizzled with Rum Sauce (see recipe below.)
Rum Sauce
2 tbsp butter
1/2 cup brown sugar
1 cup evaporated milk
1/2 tsp cornstarch
1/4 cup dark rum
1. Melt the butter and sugar over medium heat until smooth.
2. Whisk the cornstarch into the evaporated milk and pour into the sugar and butter mixture. Mix well and cook for a further 15 to 20 minutes until thickened. The sauce will continue to sticken slightly after cooking.
Sunday, February 20, 2011
Cornmeal-Crusted Tilapia in Coconut Curry Sauce

It has been a long time since I last cooked a curry dish. And for no real reason except that I've been busy cooking other things. But I am always drawn back to the intensity and spiciness of curries. You could say it's second nature, having come from a background where curried foods featured often in homes and restaurants.
My typical curry dishes are Indo-Caribbean (a style of cooking brought to the islands by groups of Indian indentured laborers in the 1800's.) In general, dry curry powder is added to hot vegetable oil, and toasted. At that point, some liquid ( sometimes water, coconut milk or a
mixture of both) will be added which forms the base of the sauce. Finally, raw, seasoned meat or fish is then added to the sauce and simmered until cooked.
For this curry recipe, I am doing the opposite: adding cooked fish (in this case, tilapia) to an already prepared sauce. While this method reduces the overall cooking time, in no way does it diminish the "curry-ness" of the dish.
Cornmeal Crusted Tilapia in Coconut Curry Sauce
Serves 4
1 cup buttermilk
1 cup yellow cornmeal
1/4 cup chopped cilantro
1 tsp garlic powder
1 tsp salt
1 tsp pepper
2 tbsp vegetable oil
Coconut Curry Sauce (see recipe below)
1. In a shallow dish , combine the cornmeal, cilantro, and garlic powder, and set aside. Pour the buttermilk into another shallow dish and set that aside. Season the tilapia fillets with salt and pepper.
2. Set up a work station beginning with the seasoned tilapia fillets, then the buttermilk, followed by the cornmeal mixture. Coat each fillet in the buttermilk and dredge with the cornmeal mixture, making sure that both sides get a substantial layer of cornmeal.
3. Cook the now cornmeal-coated fillets in a skillet coated with a thin layer of vegetable oil, about two tablespoons, until cooked throughout, about 3 to 4 minutes on each side. Transfer to a serving dish and pour over the coconut curry sauce.
Coconut Curry Sauce
1 small onion, diced
2 garlic cloves, minced
2 tsp yellow curry powder
2 tbsp vegetable oil
1 can light coconut milk
1/2 cup low sodium chicken stock
1. Cook the onion and garlic in two tablespoons of vegetable oil until the edges brown lightly. Add the curry powder and cook for another minute.
2. Pour in the chicken stock and coconut milk. Bring to a simmer, stirring constantly. Lower the heat and continue to cook until reduced by about a quarter and slightly thickened.
Friday, February 18, 2011
Spicy Tomato Soup

Making tomato soup from scratch, I discovered, is relatively easy. It starts with chopped vegetables and a can of tomatoes, and ends with a quick whiz in the blender. To make it spicy, I added two jalepenos but of course you can add more or less; it is up to you. But be warned, two can be plenty spicy.
Spicy Tomato Soup
Serves 2
1 can diced tomatoes
1 onion, diced
1 carrot, diced
1 celery stalk, chopped
2 garlic cloves, mined
2 jalepenos, chopped
zest of 1 lemon
2 tbsp chopped cilantro
1 cup vegetable broth
1/4 cup low fat evaporated milk
1. Add two tablespoons of vegetable oil to a large pot over medium heat. Cook the onion, carrot, celery, and jalepenos until softened, about five minutes. Add the tomatoes, lemon zest, cilantro, and vegetable broth. Simmer for another 6 to 8 minutes. Stir in the evaporated milk and bring back to a simmer.
2. Carefully transfer to a blender and puree until smooth. Serve with grilled cheese sandwiches, or topped with tortilla strips and low fat sour cream.
Sunday, February 13, 2011
Chocolate Cupcakes with Cream Cheese Frosting

Yesterday evening was spent with a bunch of friends, just laughing and dancing and eating and drinking. Then I got to spend all day today with Saul and Charlie. And I cannot think of a better way to spend a Valentine's weekend. And to top it off, we had cupcakes!
Chocolate Cupcakes with Cream Cheese Frosting
(Adapted from Bon Appetit)
Makes 10
1/4 cup natural unsweetened cocoa powder
1 oz milk chocolate
1/4 cup boiling water
1/4 cup low fat milk
2/3 cup cake flour
1/2 tsp baking soda
1/4 tsp salt
2/3 cup brown sugar
1/4 cup canola oil
1 large egg
1/2 tsp vanilla extract
1. Position rack in center of oven and preheat to 350 degrees F. Line muffin pans with cupcake liners.
2. Combine cocoa powder and milk chocolate in medium bowl and pour the boiling water over. Whisk until mixture is smooth then whisk in the milk.
3. Combine flour, baking soda, and salt in another medium bowl.
4. Using an electric mixer, beat sugar, oil, egg, and vanilla in a large bowl until well blended. Whisk in the cocoa mixture followed by the flour mixture. Beat until blended (batter will be thin.) Pour into prepared cupcake cups (fill each half way up) and bake for 15 minutes until a tester inserted into the center of one comes out clean. Cool completely on a wire rack before frosting. (See here for frosting recipe. )
Thursday, January 27, 2011
Time For A New Giveaway *CLOSED*
It's time for another giveaway courtesy of CSN stores. I'm sure you have heard of them by now. It seems like they sell everything from stylish kitchen accessories to modern decor.
This time, the giveaway is a $45 gift certificate good at any of their online stores. To qualify for a chance to win, leave a comment on the pervious post, become a fan of Healthy and Gourmet on Facebook or follow on Twitter.
Good luck! Contest ends Monday January 31st at 5 pm.
(Open to residents of the US and Canada only.)
THE WINNER IS ELIZABETH MOODY! THANKS FOR ALL THE ENTRIES AND GOOD LUCK NEXT TIME!
Thursday, January 20, 2011
Cheddar-Broccoli Biscuits

You know those people who will eat anything labelled "diet" even if it tastes like saw dust? I'm not one of those people. A priority for me is the uncomplicated concept that food just tastes good, even if it's fat free or low fat or sugar free. That's why when I thought of making biscuits last week, I knew I wasn't going to bother omitting butter. Butter is essential to biscuits. That savory, flaky, addictive quality of biscuits is due to butter. Omitting it would produce a product that's well ... far from what it should be. There really is no way around it.
On the other hand, enhancing a biscuit's nutritional content is possible. Simply by adding finely minced vegetables. Two stalks of broccoli in my refrigerator were begging to be used for the longest time, hence the name of this recipe. Embarrassingly, I can be similar to stubborn children sometimes in the sense that I have a low affinity for broccoli; it is preferable when disguised in savory dishes, and what better way to cover it up that in buttery biscuits.
Cheddar-Broccoli Biscuits
Makes about 2 dozens
2 cups all purpose flour
2 tsp baking powder
1 tsp salt
1/2 cup (1 stick) butter, cold
1/2 cup plus 2 tbsp low fat milk
2 cups shredded 50 % light cheddar
2 cups chopped broccoli
1/2 tsp red pepper flakes (optional)
1. In a large mixing bowl, combine the flour, baking powder, and salt. Mix the butter into the flour so until the butter becomes the pea-sized. (You can also do this in a food processor, using the pulse mode.)
2. Empty the flour mixture into a large mixing bowl, and add all of the milk. Stir with a rubber spatula to bring the mixture, together to form a ball. Add the broccoli, grated cheddar, and pepper flakes (if using) and using the spatula or your fingers, incorporate well into the dough.
3. On a floured surface, flatten the dough to about 3/4 inch thick. Using a round 2 1/2 " cookie cutter, cut out the biscuits and place on baking sheet, spacing evenly apart.
4. Bake at 400 degrees F for 30 minutes. Transfer to a wire rack to cool before serving, although these taste so much better when still warm.
Wednesday, January 12, 2011
Chicken Meatloaf

Who says eating hearty can't be healthy? Try chicken meatloaf instead of beef, and cut fat calories almost by half. For this recipe, I used Gold'n Plump 90 % lean ground chicken, and mixed in a good heaping of shredded carrots, peppers, and onions.
I also tried a new technique here. Typically, meatloaf is molded onto a baking sheet then baked. But sometimes, mine can fall apart. To get around this, I first baked the meatloaf in a rectangular pan which sets the shape nicely. Once it has cooked, the loaf is then removed from the pan unto a baking dish, and pasted with a sweet ketchup glaze.
Chicken Meatloaf
Serves 4 to 5
1 lb ground chicken (90 % lean)
1 small onion, diced
1 red bell pepper, diced
1 carrot, grated
2 garlic cloves, minced
1/2 cup plain bread crumbs
1 egg
2 tbsp sundried tomato paste
Glaze (see recipe below)
1. Cook the onions and bell pepper in two tablespoons of oil over medium heat until they have softened. Add the garlic and grated carrots, and cook for an additional five minutes. Remove from the heat, and allow to cool slightly before adding to the rest of the ingredients.
2. Combine ground chicken, egg, bread crumbs, tomato paste, salt and pepper, and the cooked vegetables. Using a wooden spoon or your fingers, mix well to thoroughly combine.
3. Transfer to a well greased 8" rectangular baking pan and bake at 375 degrees F for 45 minutes. Remove from oven and invert the pan unto a greased baking sheet to remove the meatloaf. Turn the meatloaf right side up and brush the glaze on the top and sides. Return to the oven and bake for another 10 minutes. Serve.
Glaze
1/4 cup ketchup
1 tsp honey
1 tsp worcetshire sauce
Combine all ingredients.
Saturday, January 1, 2011
Happy New Year!
It is new years day, the most optimistic time of the year. In spite of the fact that most resolutions never last past the end of January, we have resolved to lose weight, quit smoking, save more, exercise more, and the list goes on.
Yesterday, I read an article by Shape magazine's outgoing editor Valerie Latona who spoke about not fulfilling her bucket list (in reference to why she is stepping down as editor.) And it made me think about my own bucket list or, rather, my lack of one. In the same way that keeping a food journal can keep us accountable, the concept of putting on paper the things you want to achieve in the upcoming years, offers to assist in accomplishing those goals. I also like to think of it as means of exploring my own physical and metal capabilities, and the world , and a way of getting closer to family and friends.
So this year, in place of resolutions, I will begin working on my bucket list. Making the list are learning new skills such as surfing and sailing, traveling to a spanish-speaking country and speaking only spanish, and training for and completing the Napali trail in Kauai. This is a working list so I expect to add to it. And I also expect that there will be good food amidst all of this. In the mean time, I wish you the best in 2011 and look forward to sharing more recipes with you! Below are a few quick appetizers to start off the year; just click on the name below for the recipe.
Cheers!
Natasha


Subscribe to:
Posts (Atom)


